
KotlinでAndroidアプリを作成してみたい。GUIの電卓とか作ってみたいな。
こんなご要望にお応えします。
・KotlinでAndroidアプリ(電卓)を作成する方法が分かります
・Android Studioのセットアップの方法が分かります
・Android端末の実機とエミュレータのセットアップが分かります
エンジニア歴15年のうましが解説します。
Kotlinを使用したGUIアプリ(電卓)の作成
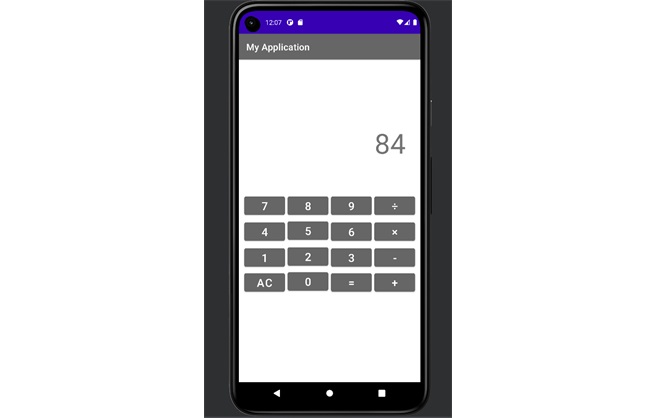
Androidの公式の開発言語でもあるKotlinを使用して簡単なGUIアプリ(電卓)を作成する手順をご紹介します。こちらのサイトを参考にさせて頂き、NULL安全化、アプリのレイアウトが崩れる対策などを加えました。完成したイメージはこちらです。
【筆者の環境】
・Android Studio Chipmunk | 2021.2.1 Patch 1
・Windows 10 64bit
Android Studioのインストール
こちらから最新のAndroid Studioをダウンロードします。『Download Android Studio』をクリックすると規約が表示されます。同意したら下のチェックを入れて『Download Android Studio Chipmunk (バージョン名) for Windows』をクリックするとインストーラーがダウンロードされますので実行してください。

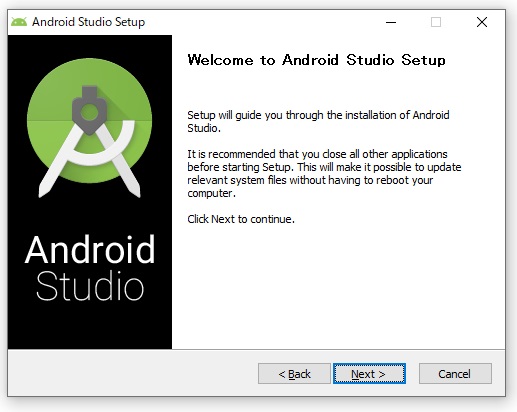
インストールはとても簡単で、インストーラーを起動したら基本的にはデフォルト(そのまま)の状態で『Next』で進むだけです。悩む部分は少ないかと思います。
プロジェクトの作成
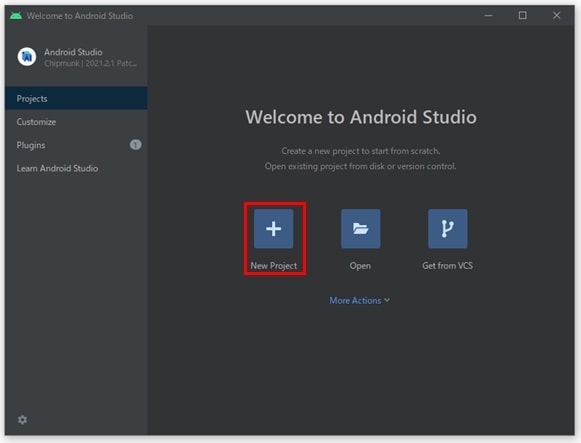
『New Project』をクリックします。
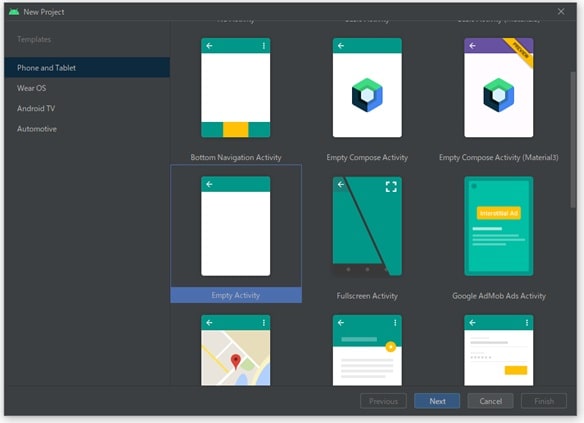
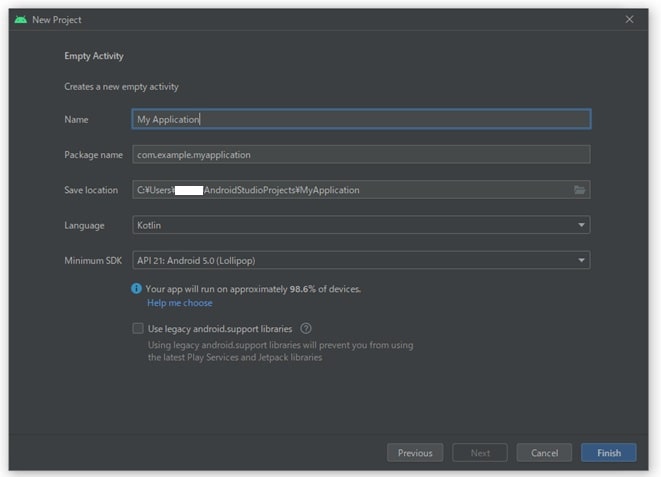
『Empty Activity』を選択してNextで進みます。
デフォルト(そのまま)の状態で『Finish』クリックしてください。
初回起動時は開発環境のセットアップが始まります。終わったら右下の『Finish』をクリックしてください。
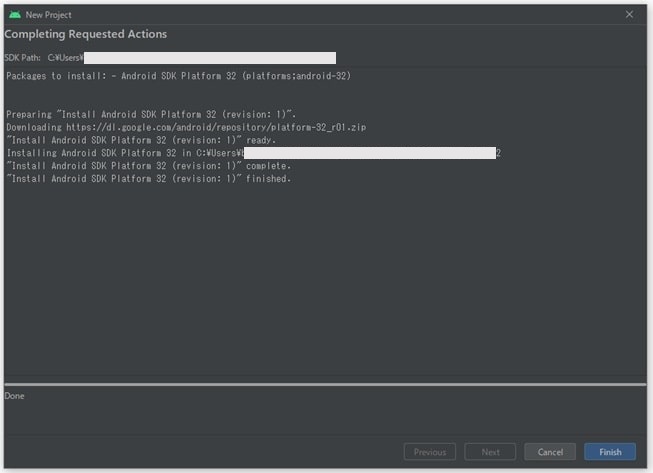
セットアップが完了すると自動で以下の画面が表示されて、実際のプログラミングに移ります。初回起動やパソコンのスペックによっては数分かかる場合もあります。
アプリのレイアウト
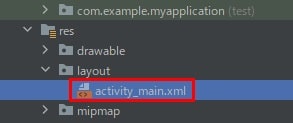
最初に起動する『activity_main.xml』を選択してください。閉じた場合は、左のツリーから『app→res→layout→activity_main.xml』を開いてください。
右上にある『Design』タブを見つけてください。
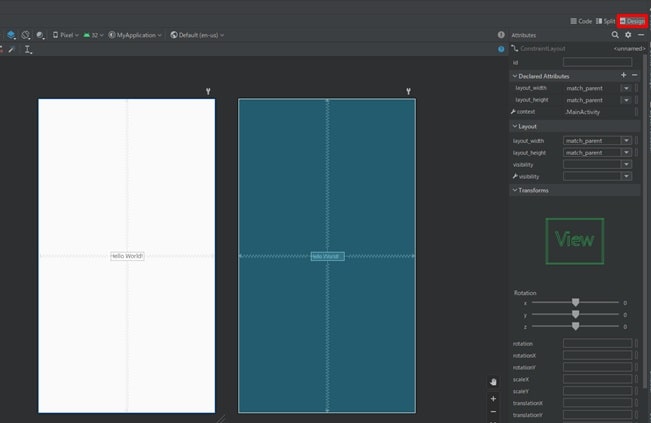
『Code』をクリックしてレイアウトをXML形式のコード表示にしてください。
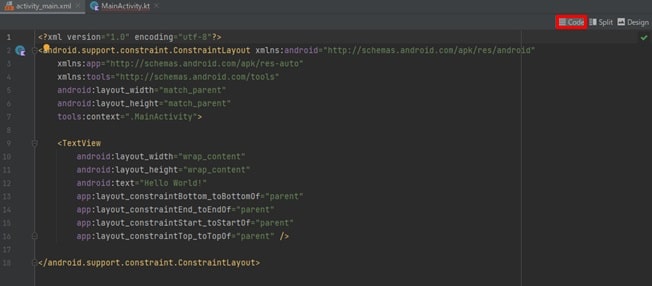
以下のコードをコピペしてください。右が切れていますので右上のアイコンをクリックしてコピーしてください。
<?xml version="1.0" encoding="utf-8"?>
<androidx.constraintlayout.widget.ConstraintLayout xmlns:android="http://schemas.android.com/apk/res/android"
    xmlns:app="http://schemas.android.com/apk/res-auto"
    xmlns:tools="http://schemas.android.com/tools"
    android:layout_width="match_parent"
    android:layout_height="match_parent"
    tools:context=".MainActivity">

<TextView
    android:id="@+id/result"
    android:layout_width="330dp"
    android:layout_height="90dp"
    android:layout_marginTop="140dp"
    android:text="0"
    android:textAlignment="viewEnd"
    android:textAppearance="@style/TextAppearance.AppCompat.Display1"
    android:textSize="60sp"
    app:layout_constraintEnd_toEndOf="parent"
    app:layout_constraintHorizontal_bias="0.493"
    app:layout_constraintStart_toStartOf="parent"
    app:layout_constraintTop_toTopOf="parent" />

<Button
    android:id="@+id/eight"
    android:layout_width="wrap_content"
    android:layout_height="wrap_content"
    android:layout_marginStart="2dp"
    android:layout_marginTop="60dp"
    android:layout_marginEnd="2dp"
    android:layout_marginBottom="2dp"
    android:text="8"
    android:textSize="24sp"
    app:layout_constraintBottom_toTopOf="@+id/five"
    app:layout_constraintEnd_toStartOf="@+id/nine"
    app:layout_constraintStart_toEndOf="@+id/seven"
    app:layout_constraintTop_toBottomOf="@+id/result" />

<Button
    android:id="@+id/two"
    android:layout_width="wrap_content"
    android:layout_height="wrap_content"
    android:layout_marginStart="2dp"
    android:layout_marginTop="2dp"
    android:layout_marginEnd="2dp"
    android:layout_marginBottom="2dp"
    android:text="2"
    android:textSize="24sp"
    app:layout_constraintBottom_toTopOf="@+id/zero"
    app:layout_constraintEnd_toStartOf="@+id/three"
    app:layout_constraintStart_toEndOf="@+id/one"
    app:layout_constraintTop_toBottomOf="@+id/five" />

<Button
    android:id="@+id/six"
    android:layout_width="wrap_content"
    android:layout_height="wrap_content"
    android:layout_marginStart="2dp"
    android:layout_marginTop="2dp"
    android:layout_marginEnd="2dp"
    android:layout_marginBottom="2dp"
    android:text="6"
    android:textSize="24sp"
    app:layout_constraintBottom_toTopOf="@+id/three"
    app:layout_constraintEnd_toStartOf="@+id/mul"
    app:layout_constraintStart_toEndOf="@+id/five"
    app:layout_constraintTop_toBottomOf="@+id/nine" />

<Button
    android:id="@+id/zero"
    android:layout_width="wrap_content"
    android:layout_height="wrap_content"
    android:layout_marginStart="2dp"
    android:layout_marginTop="2dp"
    android:layout_marginEnd="2dp"
    android:text="0"
    android:textSize="24sp"
    app:layout_constraintEnd_toStartOf="@+id/equal"
    app:layout_constraintStart_toEndOf="@+id/ac"
    app:layout_constraintTop_toBottomOf="@+id/two" />

<Button
    android:id="@+id/four"
    android:layout_width="wrap_content"
    android:layout_height="wrap_content"
    android:layout_marginStart="10dp"
    android:layout_marginTop="2dp"
    android:layout_marginEnd="2dp"
    android:layout_marginBottom="2dp"
    android:text="4"
    android:textSize="24sp"
    app:layout_constraintBottom_toTopOf="@+id/one"
    app:layout_constraintEnd_toStartOf="@+id/five"
    app:layout_constraintStart_toStartOf="parent"
    app:layout_constraintTop_toBottomOf="@+id/seven" />

<Button
    android:id="@+id/nine"
    android:layout_width="wrap_content"
    android:layout_height="wrap_content"
    android:layout_marginStart="2dp"
    android:layout_marginTop="60dp"
    android:layout_marginEnd="2dp"
    android:layout_marginBottom="2dp"
    android:text="9"
    android:textSize="24sp"
    app:layout_constraintBottom_toTopOf="@+id/six"
    app:layout_constraintEnd_toStartOf="@+id/div"
    app:layout_constraintStart_toEndOf="@+id/eight"
    app:layout_constraintTop_toBottomOf="@+id/result" />

<Button
    android:id="@+id/one"
    android:layout_width="wrap_content"
    android:layout_height="wrap_content"
    android:layout_marginStart="10dp"
    android:layout_marginTop="2dp"
    android:layout_marginEnd="2dp"
    android:layout_marginBottom="2dp"
    android:text="1"
    android:textSize="24sp"
    app:layout_constraintBottom_toTopOf="@+id/ac"
    app:layout_constraintEnd_toStartOf="@+id/two"
    app:layout_constraintStart_toStartOf="parent"
    app:layout_constraintTop_toBottomOf="@+id/four" />

<Button
    android:id="@+id/three"
    android:layout_width="wrap_content"
    android:layout_height="wrap_content"
    android:layout_marginStart="2dp"
    android:layout_marginTop="2dp"
    android:layout_marginEnd="2dp"
    android:layout_marginBottom="2dp"
    android:text="3"
    android:textSize="24sp"
    app:layout_constraintBottom_toTopOf="@+id/equal"
    app:layout_constraintEnd_toStartOf="@+id/sub"
    app:layout_constraintStart_toEndOf="@+id/two"
    app:layout_constraintTop_toBottomOf="@+id/six" />

<Button
    android:id="@+id/seven"
    android:layout_width="wrap_content"
    android:layout_height="wrap_content"
    android:layout_marginStart="10dp"
    android:layout_marginTop="60dp"
    android:layout_marginEnd="2dp"
    android:layout_marginBottom="2dp"
    android:text="7"
    android:textSize="24sp"
    app:layout_constraintBottom_toTopOf="@+id/four"
    app:layout_constraintEnd_toStartOf="@+id/eight"
    app:layout_constraintStart_toStartOf="parent"
    app:layout_constraintTop_toBottomOf="@+id/result" />

<Button
    android:id="@+id/five"
    android:layout_width="wrap_content"
    android:layout_height="wrap_content"
    android:layout_marginStart="2dp"
    android:layout_marginEnd="2dp"
    android:layout_marginBottom="2dp"
    android:text="5"
    android:textSize="24sp"
    app:layout_constraintBottom_toTopOf="@+id/two"
    app:layout_constraintEnd_toStartOf="@+id/six"
    app:layout_constraintStart_toEndOf="@+id/four"
    app:layout_constraintTop_toBottomOf="@+id/eight" />

<Button
    android:id="@+id/ac"
    android:layout_width="wrap_content"
    android:layout_height="wrap_content"
    android:layout_marginStart="10dp"
    android:layout_marginTop="2dp"
    android:layout_marginEnd="2dp"
    android:text="AC"
    android:textSize="24sp"
    app:layout_constraintEnd_toStartOf="@+id/zero"
    app:layout_constraintStart_toStartOf="parent"
    app:layout_constraintTop_toBottomOf="@+id/one" />

<Button
    android:id="@+id/equal"
    android:layout_width="wrap_content"
    android:layout_height="wrap_content"
    android:layout_marginStart="2dp"
    android:layout_marginTop="2dp"
    android:layout_marginEnd="2dp"
    android:text="="
    android:textSize="24sp"
    app:layout_constraintEnd_toStartOf="@+id/add"
    app:layout_constraintStart_toEndOf="@+id/zero"
    app:layout_constraintTop_toBottomOf="@+id/three" />

<Button
    android:id="@+id/div"
    android:layout_width="wrap_content"
    android:layout_height="wrap_content"
    android:layout_marginStart="2dp"
    android:layout_marginTop="60dp"
    android:layout_marginEnd="10dp"
    android:layout_marginBottom="2dp"
    android:text="÷"
    android:textSize="24sp"
    app:layout_constraintBottom_toTopOf="@+id/mul"
    app:layout_constraintEnd_toEndOf="parent"
    app:layout_constraintStart_toEndOf="@+id/nine"
    app:layout_constraintTop_toBottomOf="@+id/result" />

<Button
    android:id="@+id/mul"
    android:layout_width="wrap_content"
    android:layout_height="wrap_content"
    android:layout_marginStart="2dp"
    android:layout_marginTop="2dp"
    android:layout_marginEnd="10dp"
    android:layout_marginBottom="2dp"
    android:text="×"
    android:textSize="24sp"
    app:layout_constraintBottom_toTopOf="@+id/sub"
    app:layout_constraintEnd_toEndOf="parent"
    app:layout_constraintStart_toEndOf="@+id/six"
    app:layout_constraintTop_toBottomOf="@+id/div" />

<Button
    android:id="@+id/sub"
    android:layout_width="wrap_content"
    android:layout_height="wrap_content"
    android:layout_marginStart="2dp"
    android:layout_marginTop="2dp"
    android:layout_marginEnd="10dp"
    android:layout_marginBottom="2dp"
    android:text="-"
    android:textSize="24sp"
    app:layout_constraintBottom_toTopOf="@+id/add"
    app:layout_constraintEnd_toEndOf="parent"
    app:layout_constraintStart_toEndOf="@+id/three"
    app:layout_constraintTop_toBottomOf="@+id/mul" />

<Button
    android:id="@+id/add"
    android:layout_width="wrap_content"
    android:layout_height="wrap_content"
    android:layout_marginStart="2dp"
    android:layout_marginTop="2dp"
    android:layout_marginEnd="10dp"
    android:text="+"
    android:textSize="24sp"
    app:layout_constraintEnd_toEndOf="parent"
    app:layout_constraintStart_toEndOf="@+id/equal"
    app:layout_constraintTop_toBottomOf="@+id/sub" />

</androidx.constraintlayout.widget.ConstraintLayout>
『Design』に切り替えて次の画像のようになっていれば完了です。
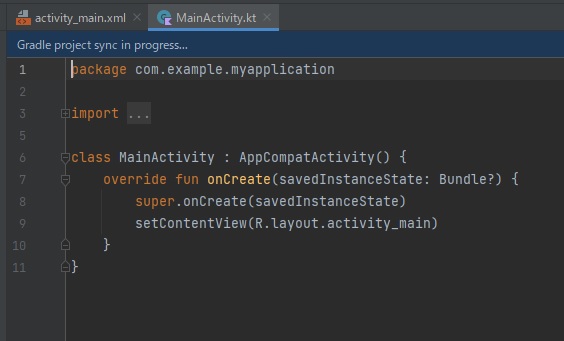
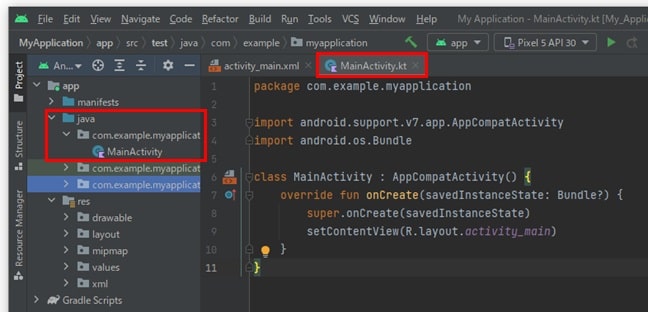
Kotlinのコードを入力
最初に起動される『MainActivity.kt』にKotlinの以下のコードをコピペしてください。閉じてしまった場合は『app→java→com.example.myapplication→MainActivity.kt』に保管されています。
package com.example.myapplication

import androidx.appcompat.app.AppCompatActivity
import android.os.Bundle
import android.widget.Button
import android.widget.TextView

class MainActivity : AppCompatActivity() {
    override fun onCreate(savedInstanceState: Bundle?) {
        super.onCreate(savedInstanceState)
        setContentView(R.layout.activity_main)

//変数の宣言

        //数値を保持する変数の宣言
        var value : Int = 0

        //AC(All Clear)のフラグ
        var ac : Boolean = false

        //演算子を押した後に数字を押すなど計算を行うかを判断するフラグ
        var calc : Boolean = false

        //実行予定の演算子を保持しておく変数
        var operator : String = "no"    //演算子を未選択状態

        //ボタンの宣言
        val btnZero : Button = findViewById(R.id.zero)
        val btnOne  : Button = findViewById(R.id.one)
        val btnTwo  : Button = findViewById(R.id.two)
        val btnThree: Button = findViewById(R.id.three)
        val btnFour : Button = findViewById(R.id.four)
        val btnFive : Button = findViewById(R.id.five)
        val btnSix  : Button = findViewById(R.id.six)
        val btnSeven: Button = findViewById(R.id.seven)
        val btnEight: Button = findViewById(R.id.eight)
        val btnNine : Button = findViewById(R.id.nine)
        val btnAdd  : Button = findViewById(R.id.add)   // +
        val btnMul  : Button = findViewById(R.id.mul)   // -
        val btnSub  : Button = findViewById(R.id.sub)   // ×
        val btnDiv  : Button = findViewById(R.id.div)   // ÷
        val btnEqual:Button = findViewById(R.id.equal)  // =
        val btnAc : Button = findViewById(R.id.ac)      // AC

        //計算結果の表示
        val resultView : TextView = findViewById(R.id.result)


//関数の宣言

        //数字ボタンを押した時の関数
        fun numBtnAction(num : String) {
            resultView.text = if(resultView.text.toString() != "0" && ac == false){
                resultView.text.toString() + num
            } else {
                ac = false
                num
            }
            calc = true
        }

        //計算を実行する際の演算子を確認する
        fun calculation(op : String) :Int {
            return if (op == "+") {
                value + resultView.text.toString().toInt()
            } else if (op == "-") {
                value - resultView.text.toString().toInt()
            } else if (op == "*") {
                value * resultView.text.toString().toInt()
            } else if (op == "/") {
                value / resultView.text.toString().toInt()
            } else {
                resultView.text.toString().toInt()
            }
        }

        //計算の行う時の処理
        fun calcBtnAction(op : String) {
            if (calc) {     //calc == true
                value = calculation(operator)
                ac = true
                calc = false
                resultView.text = value.toString()
            }
            operator = op
        }

        //イコールボタンを押した時の関数
        fun equalBtnAction() {
            if (calc) {     //calc == true
                value = calculation(operator)
                calc = false
                ac = true
                resultView.text = value.toString()
                operator = "no"         //演算子を未選択
            }
        }

        //ACを押した時の関数
        fun acBtnAction(){
            resultView.text ="0"
            value = 0
            operator = "no"             //演算子を未選択
            ac = false
            calc = false
        }

//ボタンが押されたことを検知する処理

        //0
        btnZero.setOnClickListener {
            numBtnAction("0");
        }

        //1
        btnOne.setOnClickListener {
            numBtnAction("1");
        }

        //2
        btnTwo.setOnClickListener {
            numBtnAction("2");
        }

        //3
        btnThree.setOnClickListener {
            numBtnAction("3");
        }

        //4
        btnFour.setOnClickListener {
            numBtnAction("4");
        }

        //5
        btnFive.setOnClickListener {
            numBtnAction("5");
        }

        //6
        btnSix.setOnClickListener {
            numBtnAction("6");
        }

        //7
        btnSeven.setOnClickListener {
            numBtnAction("7");
        }

        //8
        btnEight.setOnClickListener {
            numBtnAction("8");
        }

        //9
        btnNine.setOnClickListener {
            numBtnAction("9");
        }

        //+
        btnAdd.setOnClickListener {
            calcBtnAction("+")
        }

        //-
        btnSub.setOnClickListener {
            calcBtnAction("-")
        }

        //×
        btnMul.setOnClickListener {
            calcBtnAction("*")
        }

        //÷
        btnDiv.setOnClickListener {
            calcBtnAction("/")
        }

        //=
        btnEqual.setOnClickListener {
            equalBtnAction()
        }

        //AC
        btnAc.setOnClickListener {
            acBtnAction()
        }
    }
}
Android端末での実機テスト
Google USB Driverのインストール
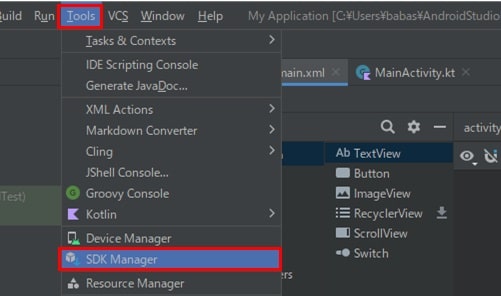
Tools→SDK Managerをクリックします。
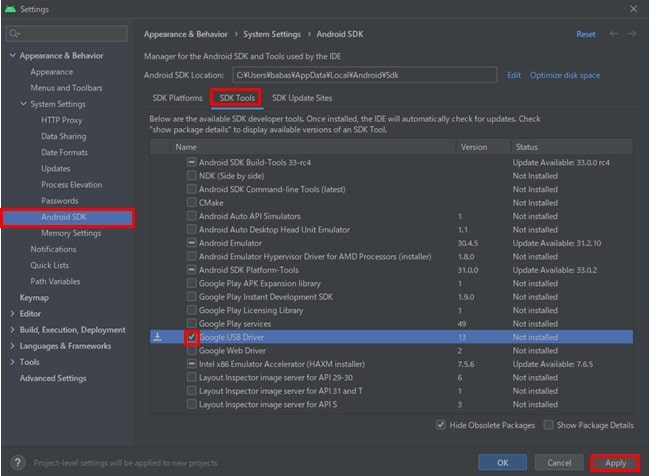
左のタブで『Android SDK』を選択し、『SDK Tools』を選択。その中から『Google USB Driver』にチェックをして右下の『Apply』をクリックします。規約などが表示されますので、流れにそって進めていきます。
インストールが始まります。終わったら『Finish』をクリックします。
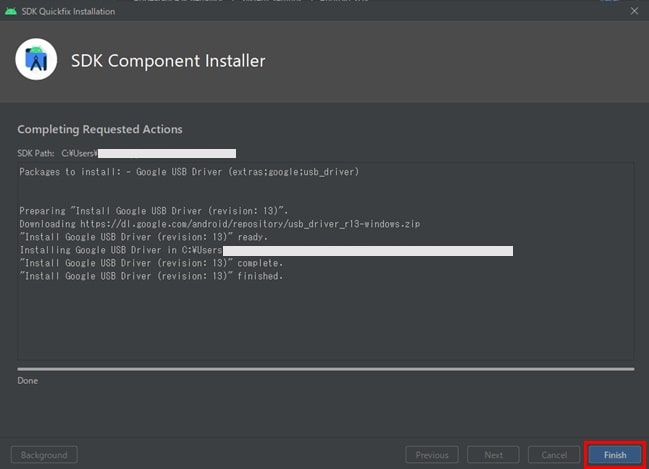
Google USB Driverが『Installed』になっていれば、ドライバーのインストールは完了です。

Android端末のセットアップ
今回は、HUAWEIの『honor9』という機種を使用します。画面の細部が異なる場合もありますが、基本的には同じ流れでセットアップできます。
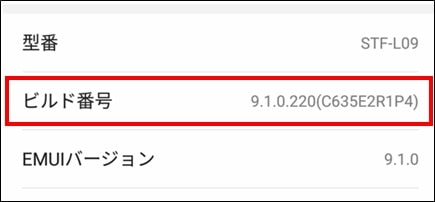
設定→システム→端末情報に進みます
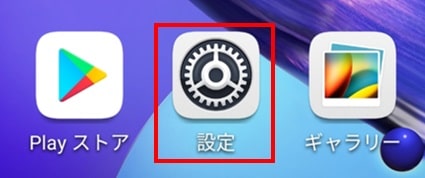

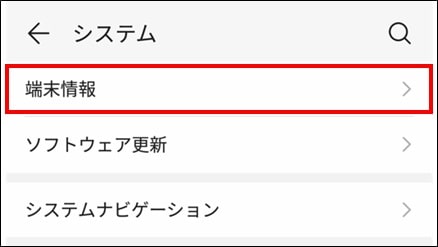
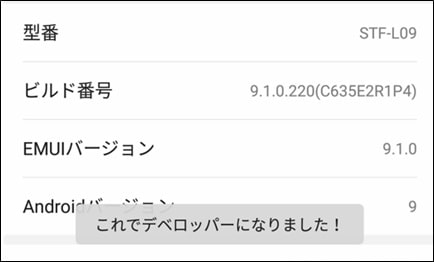
『ビルド番号』を7回タップしてください。開発者向けの操作が可能になります。
設定→システム→開発者向けオプションと進み、『開発者向けオプション』がONになっていることを確認してください。実機でのテストが完了したら最後はOFFに戻しておくことをおすすめします。
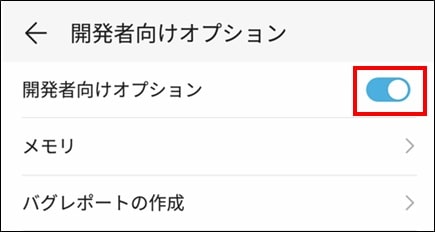
開発者向けオプション内にある『USBデバッグ』をONにします
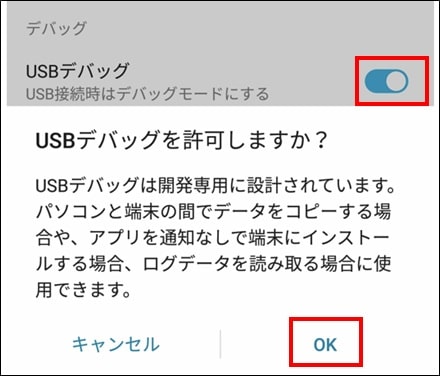
パソコンとAndroid端末をUSBで接続して、成功するとAndroid Studioの右上にAndroid端末の型式が表示されます。『▶』をクリックするとAndroid端末にアプリがインストールされて実機で確認することができます。
![]()
※画像が古いので近日差し替えます
接続がうまく行かない時は、接続時のAndroid端末が確認してくる
・充電のみ / 写真 / ファイル転送
これで『ファイル転送』を選択してください。
エミュレータでアプリの動作を確認
エミュレータはかなり重いのでパソコンのスペックによっては、スムーズに動作しないことがあります。その場合は、Android端末で動作を確認することをおすすめします。
エミュレータのセットアップ
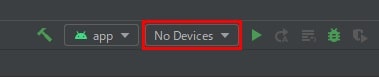
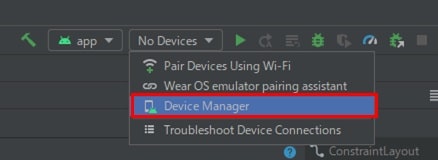
右上に表示されている『No Devices』をクリックして、表示される『Device Maneger』を選択します。
『Create device』をクリックします。

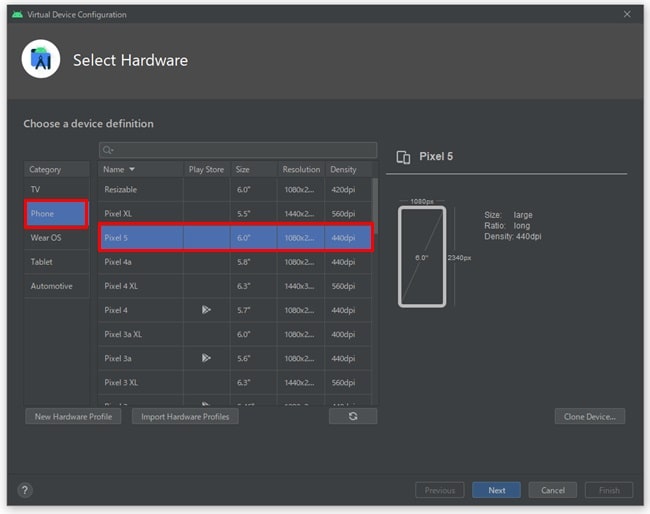
このAndroid Studio上でシミュレーションするデバイス(エミュレータ)を選択します。お好みですが、とりあえず左の『Phone』のタブから『Pixel 5』を選択して『Next』をクリックします。
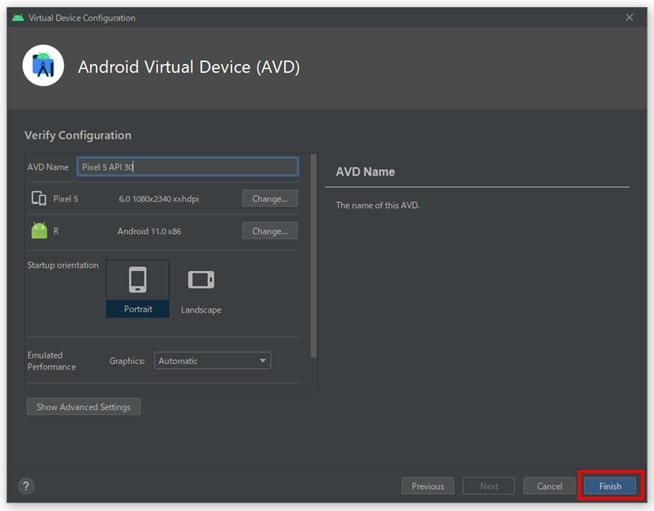
そのままデフォルトのままで『Finish』まで進んで完了です。
右上にある『▶』か、もしくは『Run→Run ‘app’』をクリックします。パソコンのスペックによっては起動に時間がかかる場合があります。

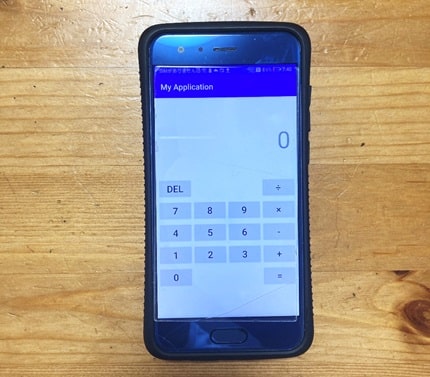
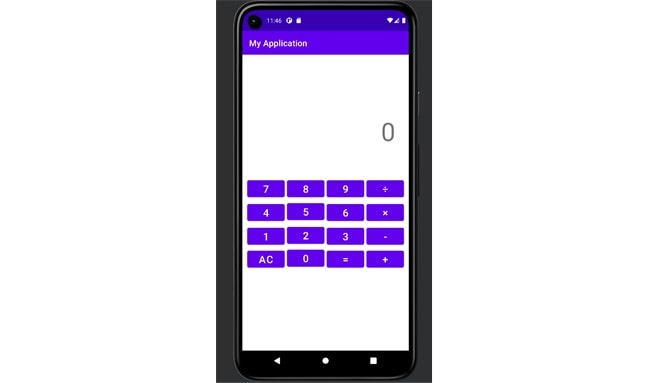
エミュレータが起動して電卓アプリの動作を確認することができます。
ボタンの色を変更したい時
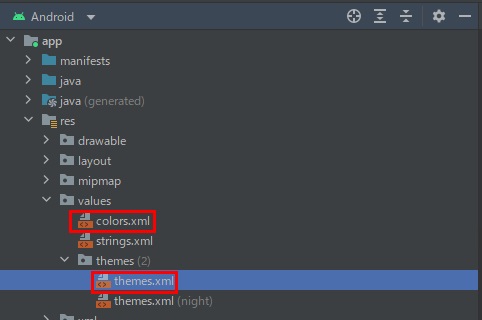
アプリのボタンの色がデフォルトは紫なので、グレーに変更します。以下の2つのファイルを開きます。
・app→res→values→colors.xml
・app→res→values→themes→themes.xml
『colors.xml』に以下をコピペします。追加したのは10行目のGREYです。
<?xml version="1.0" encoding="utf-8"?>
<resources>
    <color name="purple_200">#FFBB86FC</color>
    <color name="purple_500">#FF6200EE</color>
    <color name="purple_700">#FF3700B3</color>
    <color name="teal_200">#FF03DAC5</color>
    <color name="teal_700">#FF018786</color>
    <color name="black">#FF000000</color>
    <color name="white">#FFFFFFFF</color>
    <color name="GREY">#FF666666</color>
</resources>
『themes.xml』に以下をコピペします。変更したのは5行目です。
<resources xmlns:tools="http://schemas.android.com/tools">
    <!-- Base application theme. -->
    <style name="Theme.MyApplication" parent="Theme.MaterialComponents.DayNight.DarkActionBar">
        <!-- Primary brand color. -->
        <item name="colorPrimary">@color/GREY</item>
        <item name="colorPrimaryVariant">@color/purple_700</item>
        <item name="colorOnPrimary">@color/white</item>
        <!-- Secondary brand color. -->
        <item name="colorSecondary">@color/teal_200</item>
        <item name="colorSecondaryVariant">@color/teal_700</item>
        <item name="colorOnSecondary">@color/black</item>
        <!-- Status bar color. -->
        <item name="android:statusBarColor" tools:targetApi="l">?attr/colorPrimaryVariant</item>
        <!-- Customize your theme here. -->
    </style>
</resources>
落ち着いた雰囲気のボタンに変更することができました。
ブログやサイトでご紹介、拡散してもらえるとはげみになります!