Androidアプリの勉強中。『WebView』ってどんな機能なの?WebViewを使ったアプリを作って使い方を勉強したいな・・・
こんなご質問にお応えします。
・WebViewの用途が分かります。
・WebViewを使った簡単なAndroidアプリをご紹介します。

エンジニア歴15年のうましが解説します。
WebViewとは
インターネット上にあるWebページは『HTML』という形式で作成されています。WindowsユーザーでGoogle Chromeを使っている方ならば、キーボードの『F12』を押すとそのページのHTMLが表示されます。
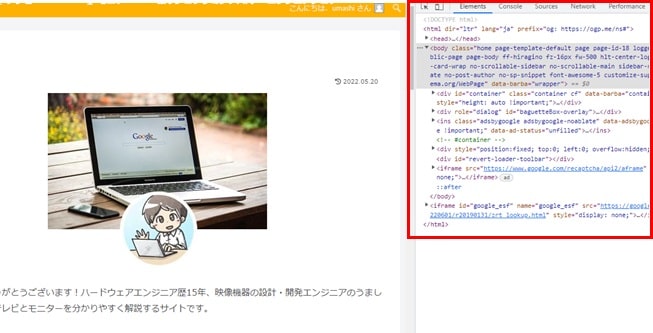 当サイトのホームのHTMLです
このHTML形式のファイル(Webページ)を見るためのアプリが、ブラウザと呼ばれる『Google Chrome』『Safari』などです。しかし、これらはAndroidやiOS用にしっかりと作り込んで開発されており、時間もコストもかかります。そのため、「ちょっとWebページをアプリで見たいな」という時に使われるHTMLを閲覧するためのアプリの部品(コンポーネント)がWebViewです。
WebViewはブラウザよりも以下の点では勝っています。
・手軽に使用できる
・HTMLの閲覧をするだけなのでOSを問わない
しかし、WebViewは以下の点ではブラウザよりも劣っていると言われます。
・ブラウザよりも速度が遅い
・作り込んだ感じにはしにくい
有名なアプリではAmazonがWebViewを利用して商品の表示などを行っていると言われています。用途によっては、WebViewを活用するとスピーディで簡単にWebページをアプリに組み込むことができるので便利です。
WebViewテスト用アプリの作成
実際にWebViewを使用した簡単なアプリを作成して動作を確認してみます。
『トップ』『お問い合わせ』『当サイトについて』の3つのボタンがあり、それらを押すと当サイトのトップ、お問い合わせ、当サイトについてを表示するという簡単なものです。機能はシンプルですが、自作したアプリでWebページを読み込むイメージを体感してもらえるかと思います。
表示されたページのリンクをタップするとブラウザが起動してしまいますが、このアプリはあくまでテスト用と考えてもらえればと思います。
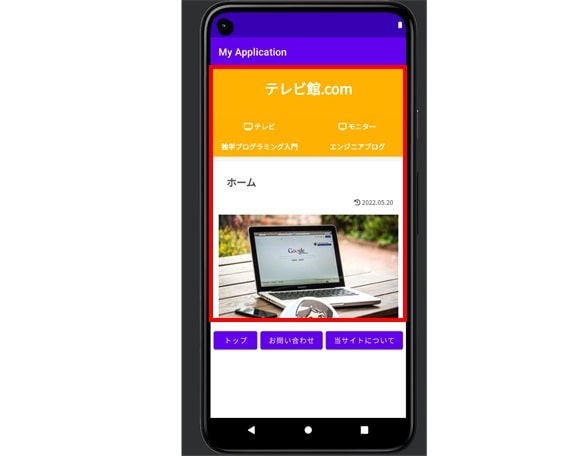
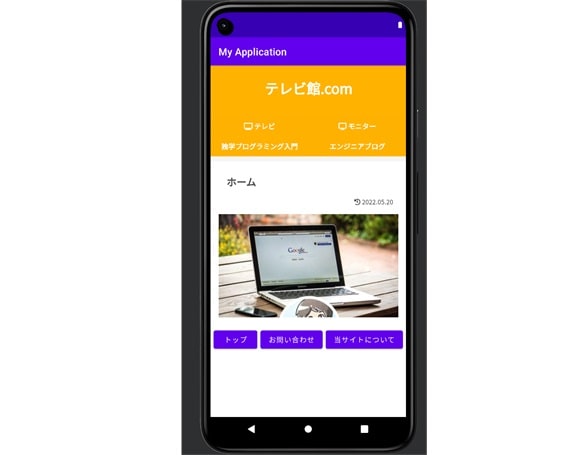
完成のイメージです。赤枠内にWebViewでWebページを組み込んでいます。
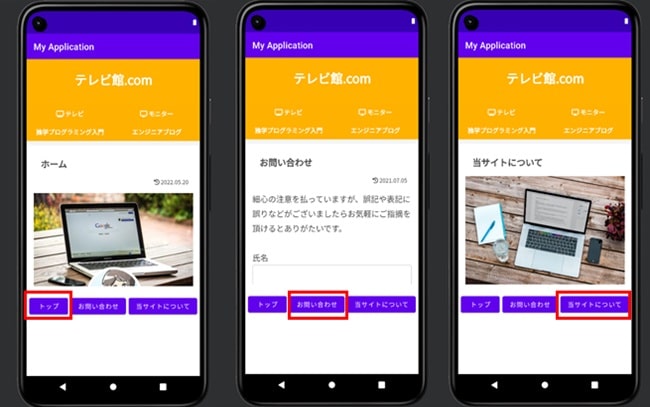
Andoroid Studioのインストールやプロジェクトの作成、エミュレータやAndroid端末への書き込みはこちらの記事で細かく解説しています。
レイアウトのコード
『activity_main.xml』に次のコードをコピペしてください。右が切れているので右上のアイコンでコピーしてもらうことをおすすめします。
<?xml version="1.0" encoding="utf-8"?>
<androidx.constraintlayout.widget.ConstraintLayout xmlns:android="http://schemas.android.com/apk/res/android"
    xmlns:app="http://schemas.android.com/apk/res-auto"
    xmlns:tools="http://schemas.android.com/tools"
    android:layout_width="match_parent"
    android:layout_height="match_parent"
    tools:context=".MainActivity">

    <WebView
        android:id="@+id/webView"
        android:layout_width="match_parent"
        android:layout_height="500dp" />

    <Button
        android:id="@+id/top"
        android:layout_width="wrap_content"
        android:layout_height="wrap_content"
        android:layout_marginTop="20dp"
        android:text="トップ"
        app:layout_constraintEnd_toStartOf="@+id/contact"
        app:layout_constraintStart_toStartOf="parent"
        app:layout_constraintTop_toBottomOf="@+id/webView" />

    <Button
        android:id="@+id/contact"
        android:layout_width="wrap_content"
        android:layout_height="wrap_content"
        android:layout_marginTop="20dp"
        android:text="お問い合わせ"
        app:layout_constraintEnd_toStartOf="@+id/policy"
        app:layout_constraintStart_toEndOf="@+id/top"
        app:layout_constraintTop_toBottomOf="@+id/webView" />

    <Button
        android:id="@+id/policy"
        android:layout_width="wrap_content"
        android:layout_height="wrap_content"
        android:layout_marginTop="20dp"
        android:text="当サイトについて"
        app:layout_constraintEnd_toEndOf="parent"
        app:layout_constraintStart_toEndOf="@+id/contact"
        app:layout_constraintTop_toBottomOf="@+id/webView" />

</androidx.constraintlayout.widget.ConstraintLayout>
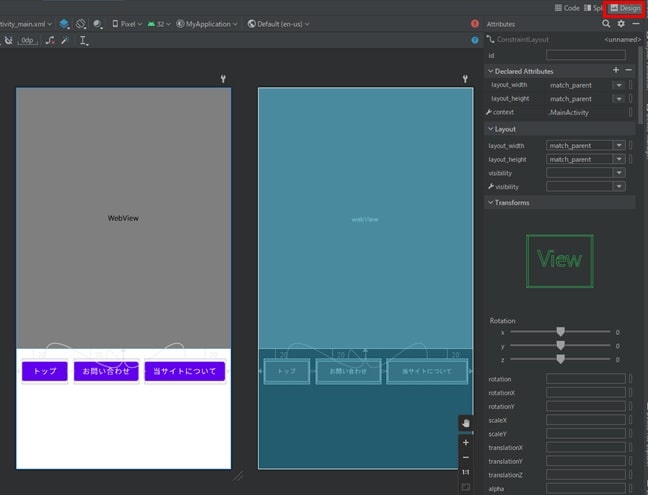
『Design』タブにして以下のようになることを確認してください。
Androidマニュフェストの変更
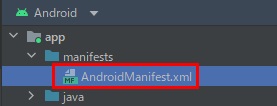
『app→manifests→AndroidManifest.xml』を開いて以下をコピペしてください。追加するのは5行目だけです。
<?xml version="1.0" encoding="utf-8"?>
<manifest xmlns:android="http://schemas.android.com/apk/res/android"
    xmlns:tools="http://schemas.android.com/tools"
    package="com.example.myapplication">
    <uses-permission android:name="android.permission.INTERNET" /><!-- 追加-->

    <application
        android:allowBackup="true"
        android:dataExtractionRules="@xml/data_extraction_rules"
        android:fullBackupContent="@xml/backup_rules"
        android:icon="@mipmap/ic_launcher"
        android:label="@string/app_name"
        android:roundIcon="@mipmap/ic_launcher_round"
        android:supportsRtl="true"
        android:theme="@style/Theme.MyApplication"
        tools:targetApi="31">
        <activity
            android:name=".MainActivity"
            android:exported="true">
            <intent-filter>
                <action android:name="android.intent.action.MAIN" />

                <category android:name="android.intent.category.LAUNCHER" />
            </intent-filter>
        </activity>
    </application>

</manifest>
Kotlinのコードの変更
『MainActivity.kt』に以下のコードをコピペしてください。
package com.example.myapplication

import androidx.appcompat.app.AppCompatActivity
import android.os.Bundle
import android.webkit.WebView
import android.widget.Button


class MainActivity : AppCompatActivity() {
    override fun onCreate(savedInstanceState: Bundle?) {
        super.onCreate(savedInstanceState)
        setContentView(R.layout.activity_main)

        val btnTop: Button = findViewById(R.id.top)
        val btnTv: Button = findViewById(R.id.contact)
        val btnMonitor: Button = findViewById(R.id.policy)

        val webView: WebView = findViewById(R.id.webView)
        webView.loadUrl("https://uma-shi.com/")

        btnTop.setOnClickListener {
            webView.loadUrl("https://uma-shi.com/")
        }

        btnTv.setOnClickListener {
            webView.loadUrl("https://uma-shi.com/contact-form")
        }

        btnMonitor.setOnClickListener {
            webView.loadUrl("https://uma-shi.com/admin")
        }
    }
}アプリを実行して、ボタンを押すとアプリでWebページを取得できるかと思います。繰り返しになりますが、アプリでWebページを取得するために組み込む部品(コンポーネント)がWebViewです。
ブログやサイトでご紹介、拡散してもらえるとはげみになります!
