AndroidアプリをKotlinで作ってみたいな・・・ストップウォッチとか作成してみたい。
こんなご要望にお応えします。
・Android Studioを使用してアプリ開発が分かります。
・Kotlinでストップウォッチを作成する方法が分かります

エンジニア歴15年のうましが解説します。
KotlinでAndroidアプリ入門・ストップウォッチ作成
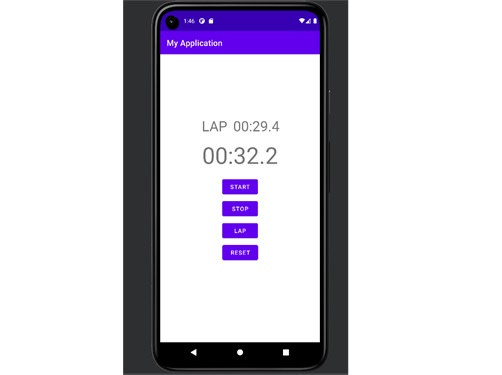
まずはストップウォッチの基本的な機能を実装します。完成したアプリのイメージはこちらです。
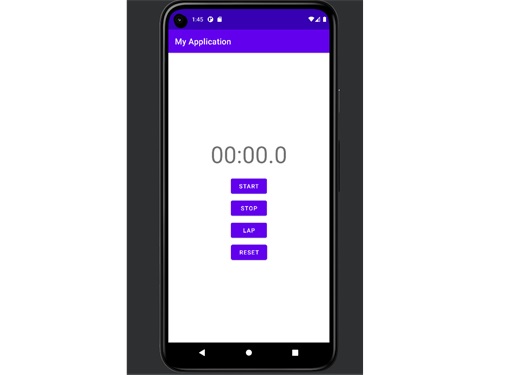 アプリを起動時
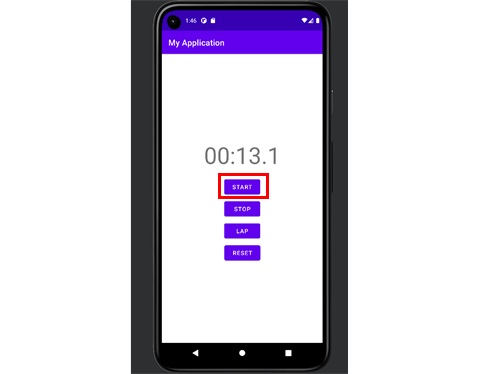 『START』でカウントアップを開始
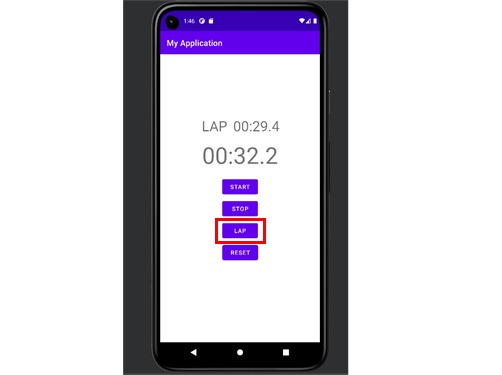 『LAP』でその時の値を保持
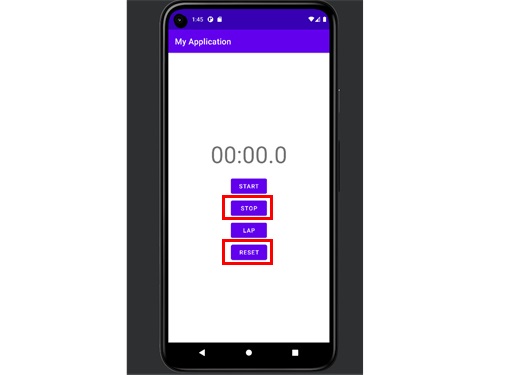 『STOP→RESET』で初期状態に戻る
Android Studioのインストールやエミュレータ設定、Android端末への書き込みなどはこちらで細かくご紹介していますので、よろしければ合わせて確認してもらえればと思います。
プロジェクトの作成
『New Project』で『Empty Activity』を選択し、デフォルト(初期状態)で『Finish』まで進んでください。
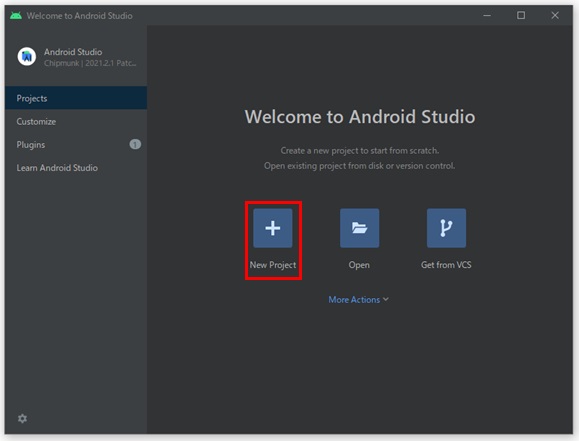 『New Project』を選択
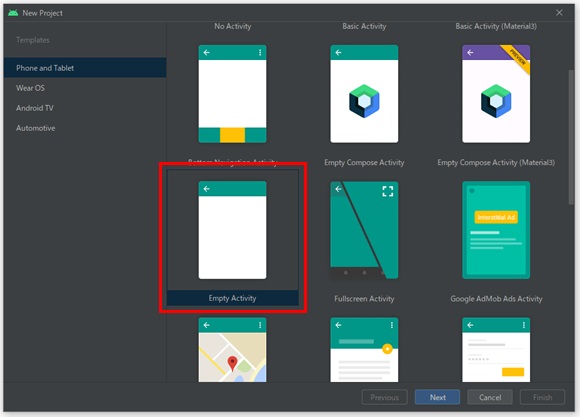 『Empty Activity』を選択
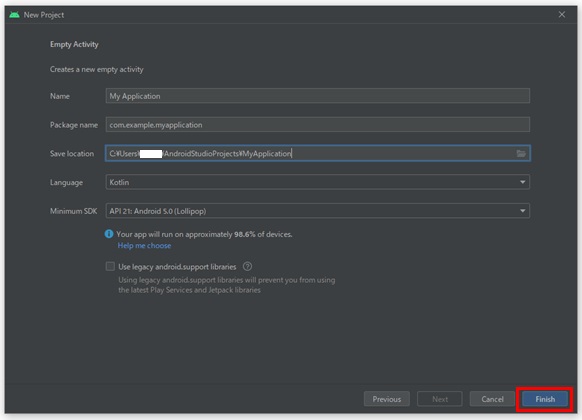 『Use legacy android.support libraries』にチェックを入れないでください。
Kotlinのコードを入力
『MainActivity.kt』に次のコードをコピペしてください。
package com.example.myapplication

import androidx.appcompat.app.AppCompatActivity
import android.os.Bundle
import android.os.Handler
import android.widget.Button
import android.widget.TextView
import java.text.SimpleDateFormat
import java.util.*

class MainActivity : AppCompatActivity() {

    companion object {
        private const val TERM_MILLISECOND: Long = 100  //0.1秒
    }

    override fun onCreate(savedInstanceState: Bundle?) {
        super.onCreate(savedInstanceState)
        setContentView(R.layout.activity_main)

        //ボタンを宣言
        val startBtn = findViewById<Button>(R.id.start_button)
        val stopBtn = findViewById<Button>(R.id.stop_button)
        val resetBtn = findViewById<Button>(R.id.reset_button)
        val lapBtn = findViewById<Button>(R.id.lap_button)

        //表示関係の宣言
        val countView = findViewById<TextView>(R.id.count_label)    //タイマーのカウント値の表示
        val lapView = findViewById<TextView>(R.id.lap_label1)       //ラップの値の表示
        val lapText = findViewById<TextView>(R.id.lap_text1)        //『LAP』の文字の表示

        var t = 0L          //カウント値を格納する変数
        var lapTime = 0L    //ラップを格納する変数
        val dataFormat = SimpleDateFormat("mm:ss.S", Locale.getDefault())

        val handler = Handler()
        val timer = object : Runnable {
            override fun run() {
                t += TERM_MILLISECOND       //tに+0.1(秒)をする
                countView.text = dataFormat.format(t)               //カウント値を表示する
                handler.postDelayed(this, TERM_MILLISECOND)      //0.1秒後にまた呼び出される
            }
        }

        var startFlag:Boolean = false       //STARTボタンを押されたことを判定するフラグ true = ON / false = 押されていない

        //STARTボタンを押された時の処理
        startBtn.setOnClickListener {
            if (!startFlag) {
                startFlag = true
                handler.post(timer)
            }
        }

        //STOPボタンを押された時の処理
        stopBtn.setOnClickListener {
            startFlag = false
            handler.removeCallbacks(timer)
        }

        //RESETボタンを押された時の処理
        resetBtn.setOnClickListener {
            t = 0L
            lapTime = 0L
            countView.text = dataFormat.format(t)
            lapView.text = ""       //ラップの値表示を非表示
            lapText.text = ""       //『LAP』の文字を消す
        }

        //LAPボタンを押された時の処理
        lapBtn.setOnClickListener {
            lapTime = t
            lapView.text = dataFormat.format(lapTime)
            lapText.text = "LAP"
        }
    }
}
レイアウトのコードを入力
『activity_main.xml』を開き、右上のタブを『Dsign→Code』に切り替えて次のコードをコピペしてください。
<?xml version="1.0" encoding="utf-8"?>
<androidx.constraintlayout.widget.ConstraintLayout xmlns:android="http://schemas.android.com/apk/res/android"
    xmlns:app="http://schemas.android.com/apk/res-auto"
    xmlns:tools="http://schemas.android.com/tools"
    android:layout_width="match_parent"
    android:layout_height="match_parent"
    tools:context=".MainActivity">

    <Button
        android:id="@+id/start_button"
        android:layout_width="wrap_content"
        android:layout_height="wrap_content"
        android:layout_marginTop="300dp"
        android:text="start"
        app:layout_constraintBottom_toTopOf="@+id/stop_button"
        app:layout_constraintLeft_toLeftOf="parent"
        app:layout_constraintRight_toRightOf="parent"
        app:layout_constraintTop_toTopOf="parent" />

    <Button
        android:id="@+id/stop_button"
        android:layout_width="wrap_content"
        android:layout_height="wrap_content"
        android:layout_marginTop="5dp"
        android:layout_marginBottom="5dp"
        android:text="stop"
        app:layout_constraintBottom_toTopOf="@+id/lap_button"
        app:layout_constraintLeft_toLeftOf="parent"
        app:layout_constraintRight_toRightOf="parent"
        app:layout_constraintTop_toBottomOf="@id/start_button" />

    <TextView
        android:id="@+id/count_label"
        android:layout_width="wrap_content"
        android:layout_height="wrap_content"
        android:layout_marginBottom="16dp"
        android:text="00:00.0"
        android:textAppearance="@style/TextAppearance.AppCompat.Display3"
        app:layout_constraintBottom_toTopOf="@id/start_button"
        app:layout_constraintLeft_toLeftOf="parent"
        app:layout_constraintRight_toRightOf="parent" />

    <Button
        android:id="@+id/reset_button"
        android:layout_width="wrap_content"
        android:layout_height="wrap_content"
        android:layout_marginBottom="250dp"
        android:text="reset"
        app:layout_constraintBottom_toBottomOf="parent"
        app:layout_constraintEnd_toEndOf="parent"
        app:layout_constraintHorizontal_bias="0.501"
        app:layout_constraintStart_toStartOf="parent"
        app:layout_constraintTop_toBottomOf="@+id/lap_button" />

    <TextView
        android:id="@+id/lap_label1"
        android:layout_width="wrap_content"
        android:layout_height="wrap_content"
        android:layout_marginStart="80dp"
        android:layout_marginTop="150dp"
        android:layout_marginBottom="10dp"
        android:text="  "
        android:textAppearance="@style/TextAppearance.AppCompat.Display1"
        app:layout_constraintBottom_toTopOf="@+id/count_label"
        app:layout_constraintEnd_toEndOf="parent"
        app:layout_constraintStart_toStartOf="parent"
        app:layout_constraintTop_toTopOf="parent" />

    <Button
        android:id="@+id/lap_button"
        android:layout_width="wrap_content"
        android:layout_height="wrap_content"
        android:layout_marginBottom="5dp"
        android:text="lap"
        app:layout_constraintBottom_toTopOf="@+id/reset_button"
        app:layout_constraintEnd_toEndOf="parent"
        app:layout_constraintStart_toStartOf="parent"
        app:layout_constraintTop_toBottomOf="@+id/stop_button" />

    <TextView
        android:id="@+id/lap_text1"
        android:layout_width="wrap_content"
        android:layout_height="wrap_content"
        android:layout_marginTop="150dp"
        android:layout_marginEnd="15dp"
        android:layout_marginBottom="10dp"
        android:text="  "
        android:textAppearance="@style/TextAppearance.AppCompat.Display1"
        app:layout_constraintBottom_toTopOf="@+id/count_label"
        app:layout_constraintEnd_toStartOf="@+id/lap_label1"
        app:layout_constraintTop_toTopOf="parent" />

</androidx.constraintlayout.widget.ConstraintLayout>
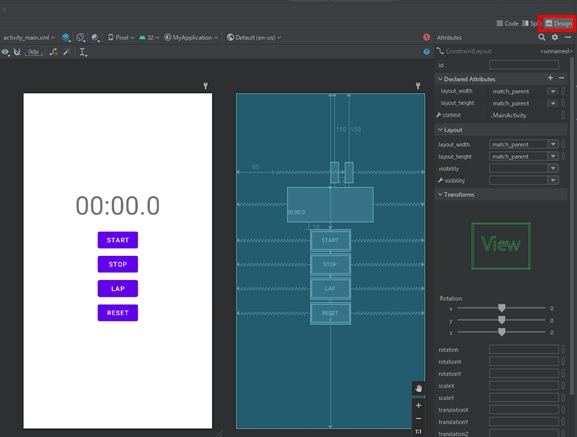
右上のタブで『Design』を選択し、以下のようになっていれば完成です。
エミュレータで実行、またはAndroid端末に書き込むとアプリを動作させることができます。
ボタンの色の変更を行う
デフォルト(初期設定)のボタンの色は鮮明な紫なので、好みが分かれるところです。次はボタンを落ち着いたグレーに変更したいと思います。
左のツリーから『res→values→colors.xml』を開いて以下をコピペしてください。
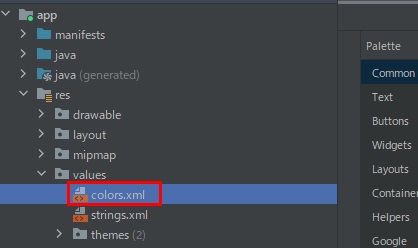
10行目の『GREY』を追加しています。16進数の8桁は上の2桁は透明度、下の6桁がRGBを表しています。ぜひお好みの色に変更してみてください。
<?xml version="1.0" encoding="utf-8"?>
<resources>
    <color name="purple_200">#FFBB86FC</color>
    <color name="purple_500">#FF6200EE</color>
    <color name="purple_700">#FF3700B3</color>
    <color name="teal_200">#FF03DAC5</color>
    <color name="teal_700">#FF018786</color>
    <color name="black">#FF000000</color>
    <color name="white">#FFFFFFFF</color>
    <color name="GREY">#FF666666</color>
</resources>
次は『res→values→themes→themes.xml』を開いて以下をコピペしてください。
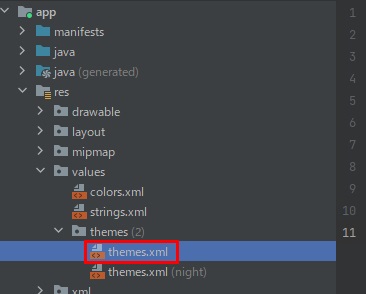
5行目の『purple_500』を『GREY(先ほど追加したもの)』に変更しています。
<resources xmlns:tools="http://schemas.android.com/tools">
<!-- Base application theme. -->
<style name="Theme.MyApplication" parent="Theme.MaterialComponents.DayNight.DarkActionBar">
<!-- Primary brand color. -->
<item name="colorPrimary">@color/GREY</item>
<item name="colorPrimaryVariant">@color/purple_700</item>
<item name="colorOnPrimary">@color/white</item>
<!-- Secondary brand color. -->
<item name="colorSecondary">@color/teal_200</item>
<item name="colorSecondaryVariant">@color/teal_700</item>
<item name="colorOnSecondary">@color/black</item>
<!-- Status bar color. -->
<item name="android:statusBarColor" tools:targetApi="l">?attr/colorPrimaryVariant</item>
<!-- Customize your theme here. -->
</style>
</resources>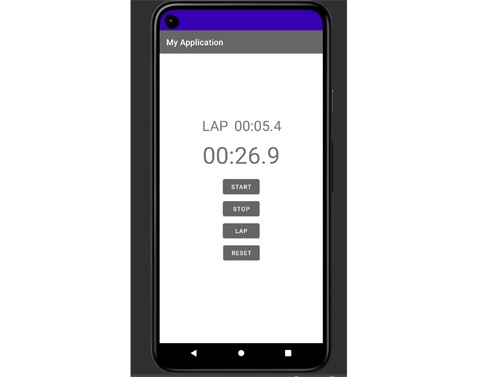 落ち着いた雰囲気のボタンになりました。
ブログやサイトでご紹介、拡散してもらえるとはげみになります!
